Posted on

New Video Tutorial on Youtube – Tiny Crystal Point Wire Wrap

As you can probably tell already, I use a lot of crystal points in my jewelry designs. Whether they are drilled or undrilled, they can present a lot of design challenges. That’s one of the things I like most about them. So, when I found a great deal on a lot of tiny undrilled crystal points, well, challenge accepted.

When I said they were tiny, I meant it. These are about 3mm thick and 15-18mm long. At first, trying to wrap these securely without covering up the stone seemed like it would be more trouble that it was worth. But then I had one of those moments where it just clicked. I’ve come up with a couple of ways to wrap them, but this one, with it’s graceful curve that sweeps up the side, is one of my favorites.

So, when facebook reminded me that it’s been 3 years since my last video (oops) so I decided to do a quick one and show you how I wrap these little itty bitty crystals.

I still haven’t quite found a video set up I’m completely happy with, so please bear with me while I experiment. As always, if you have any suggestions for improving my videos, I’d love to hear them 🙂 .

This one is a very quick and simple wrap for crystal points that are very small. The one I’m using in the video is about 3.5mm thick and 18mm long. For a crystal point this size, I used 16 gauge (1.2mm) wire.

For this project, you’ll also need a needle file or a piece of 320 or 400 grit sandpaper (for smoothing wire ends), flush cutters, needle nose pliers, round nose pliers, bail making pliers (in a pinch you can use the widest part of your round nose pliers), a hammer and a bench block.

You can wrap larger crystals in a similar style, however, the larger the crystal point, the thicker the wire you will need.

You can watch the video below, or if you prefer, you can watch it on Youtube.


Posted on

Cobra Head Bail Pendants – Design Variations

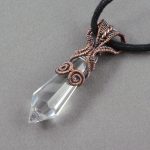
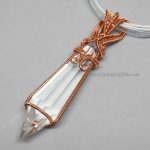
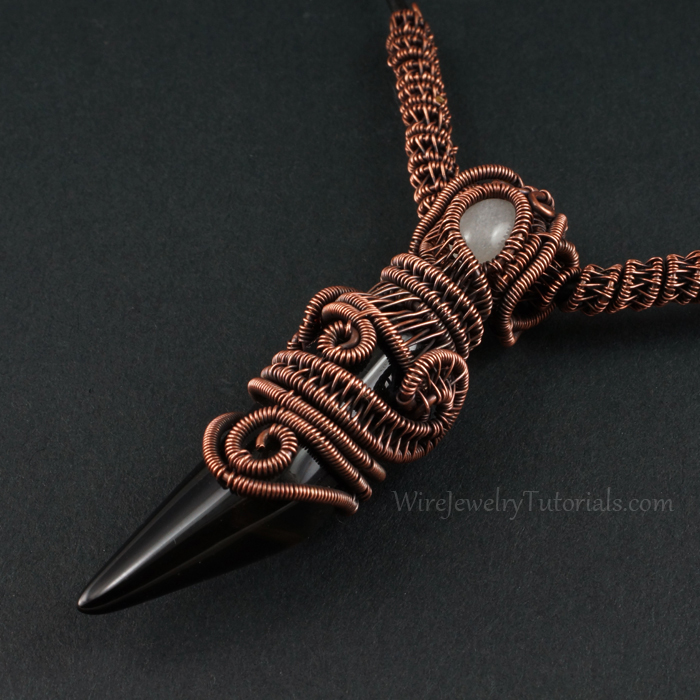
Anyone who has been following my work for a while now has probably already guessed how much I like to wrap the icicle shaped crystal prisms. I do quite a few wraps for them, but my favorite is the Cobra Head Bail design.


Above is the most basic design. I like it because of it’s simplicity, but even more for it’s versatility. If you change just one element of the design you can achieve many different looks. The easiest thing to change is the top layer of the bail. You can twist it instead of weaving it. Or you can use different types of weaves to alter the look. Make some changes to the attachment at the front of the pendant below the bail and you can make even an even more dramatic look.


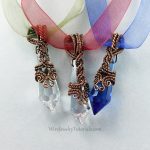
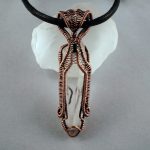
For these pendants I made a couple of different changes. For the first one on the left, I added beads to the weave on the top layer of the bail. Then, for the front of the pendant underneath the bail, instead of working it as in the tutorial, I crossed the two pieces that come from the back of the bail, then continued as in the tutorial to finish the pendant.

For the pendants in the other two photos, I continued the criss cross down the front a couple times, creating a wave pattern with the two woven strips, again, finishing the pendant off as in the tutorial. This works great if you have a prism that has a chip on one of the facets in front and you need something to cover it with.


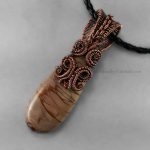
The first two prisms in this gallery were originally made to show how a stone that is shaped similarly to a prism, but isn’t drilled, could be wrapped with this same design. By adding a support to the base of the prism, then continuing to weave up either the front or the sides of the prism, you can finish off the pendant with the Cobra Head Bail, making slight adjustments to the way the attachments in the front are made. The first pendant in this row is using the hole in the prism for the second set of wires. However, with a little imagination, you can find a way to work around that as well.

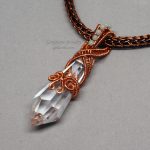
The last pendant shown above is a bit closer to the original design. For this one I wove down the front a bit farther than in the design in the tutorial using a modified ladder weave, then finished all the wires off in the back of the pendant.


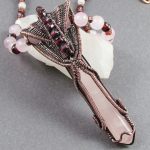
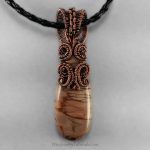
My most popular pieces with the Cobra Head design are the crystal prisms I’ve been wrapping for the last 6 years. But I’d been playing with other variations of the bail design for quite some time before that. The Rose Quartz crystal point pendant in the first photo here is one of the first variations of this design. I had set the crystal point in a border wrap, but I needed to find a way to finish off all the wires. There is kind of a standard way that most border wraps are finished. Cut a couple wires, hide them, and add a few swirls with the rest of the wires after you make the bail. I wanted to challenge myself to use all the wires that were there, without going overboard with the spirals and swirls. So I picked up my weaving wire and a couple hours later, this is what I had come up with.

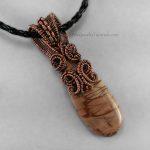
The second photo above is one I made after trying to simplify the design a bit. I still started with a border wrap, but I used fewer wires. Instead of making separate layers for the bail, I put all the frame wires into one weave.

The last photo in this row shows how this style of bail looks on a different shape of stone. I made a type of woven bezel for this one that leaves part of the edge of the stone uncovered (something I would no longer recommend doing, now that I have more experience). For the bail, I started by weaving all the wires together at the top, but then split it into two strips before continuing. As I got closer to the bottom of where the necklace would go through, I started adding beads. I finished this one with a criss cross over the front of the cab.


This is my most recent work with this design. I took a faux stone cabochon I had made from polymer clay and front drilled it at the top. I started out as in the tutorial, but then I changed it up a bit. I added woven spirals to each of the attachments on the front of the pendant. It still has a similar look to the design in the tutorial, but it adds an extra layer of depth that goes well with the shape of the “stone”.


The funny thing is though, without this pendant, which looks nothing like the others in this post, I may never have thought to do any of these other pendants in this style. If you look really closely, you can see the first of these that I ever made (that I can recall anyway). Underneath the layers of coiled and woven wire is the beginning of the Cobra Head Bail.

Posted on

Playing with my Woven Crystal Point Wrap Design

Normally, when I decide to teach a design, I do my best to strip it down to it’s easiest, most teachable, basic design, while still keeping it visually interesting. Once I have that part down and the tutorial is done, I have to see where else I can go with it. I like to push the limits on it and see how far I can take it. What will it look like on a different shape of focal? How many more curlicues can I add before it starts to look ridiculous? The design I teach in my Woven Crystal Point Wrap tutorial is no exception.

Woven Crystal Point Wrap Variation

This piece is made with a kite shaped polymer clay faux labradorite cabochon I made, then front drilled in order to add the wirework. I didn’t change the wirework too much from the tutorial, except to adjust it to the shape of the focal. I wanted to keep it simple so that it didn’t compete with the colors in the “stone”.

Woven Crystal Point Wrap Variation Woven Crystal Point Wrap Variation

For these two, I still kept it somewhat simple. I did add a little more detail to the design on the teardrop, but mostly it was just to take it farther down the stone. For the agate slice, I kept it neat and tidy near the top and added a few beads.


Woven Crystal Point Wrap Variation

This one is one of the earliest versions of this design. I made it back in 2011. I had this really thin agate point that I wanted to wrap but I wasn’t sure how to do it without making it too bulky looking. I kept the wirework close and tight and used an open style weave. To keep it from looking to plain I added beads tot he frame wire between the wraps for one section of it.

If you’d like to learn how to add beads onto the weave same way I did on this pendant, you can see my Seed Beaded Frame for a Focal Bead tutorial. It uses the same weave as this, with beads added.

Woven Crystal Point Wrap Variation Woven Crystal Point Wrap Variation

These are two of my favorites. In the right kind of light, these Opalite points seem to almost glow. I don’t like covering that up, so I prefer to keep the wrapping on them close to the top of the pendant. This doesn’t give a whole lot of room for variation, though. So to mix it up a bit on the one on the left, I used the Zig Zag Weave from my Advanced Weaving Techniques tutorial for part of the weaving. For the one on the right I made tiny double spirals and wrapped them onto the frame wires with the weaving wire to give it a filigree effect.


Woven Crystal Point Wrap Variation

At the time I made this one, I was playing around with different ways to incorporate stamped metal sheet into different designs. I attached it to the pendant by drilling holes into the sheet that line up with the hole in the stone. The wire is then inserted through both the stone and the 2 holes in the metal sheet, then worked as in the tutorial. I only did one woven wrap around the stone and finished both frame wires off in the back to keep the front simple.


Woven Crystal Point Wrap Variation

I made this one a little more complex. I added a skull bead to the top (both wires fit through the bead) and started the wrap above the skull instead of at the top of the crystal point.


Woven Crystal Point Wrap Variation

As with most things in life, as much as I say I love to keep things simple, I’m never really happy until I’ve mucked it up and made everything way too complicated. Do you really think jewelry design would be any different for me?

These agate claws have rather large holes in them, so it was easy to put extra wires through it. For this piece I took advantage of that and used the extra wires to make a much wider bail. This made it possible for me to trap a small quartz cabochon against the front of the bail with a woven bezel. The bezel I used is similar to the one I teach in my Odyssey tutorial, except that I used the weaving wire to attach it to the bail in several places as I went along. From there I continued to weave along the length of the stone as in the Woven Crystal Point Wrap tutorial. To make it more interesting, in a couple places I curled the frame wires back over themselves as I wove the wire over them to create curls and spirals.

If you are interested in purchasing faux labradorite polymer clay cabochons, I still have a few available in my supply shop on etsy, WireAndBeadSupplies.

If you would like more information about the first pendant shown above, you can find it at Fairies In The Forest.

Posted on

Grand Re-Opening Giveaway!

To celebrate the fact that I finally got around to redoing this web-site (which I’ve only been planning for almost a year now, lol) I decided to have a giveaway. So, here’s how it goes. Enter the giveaway using the rafflecopter widget below and whoever wins gets the FULL COLLECTION of tutorials from the web-site.

You can increase your odds of winning by doing each action on the widget. You can also come back every day to get another entry.

Giveaway ends on Tuesday, August 7th, 2018 at 11:59pm ET. The winner will be announced on Wednesday, August 8th, 2018.


a Rafflecopter giveaway

Still want to increase your odds of winning? I’m also holding a giveaway on Facebook. Check out the Gailavira Jewelry Fan Page to enter.

Terms and Conditions
Giveaway is open to anyone who lives on planet Earth.

All entries will be verified for validity before the final drawing. If the action corresponding to the entry was not committed, the entry will be deleted.

Although the winner will be given the tutorials for free, the copyright terms for premium (paid) tutorials still applies. Please see this page for more information:
https://www.wirejewelrytutorials.com/copyright-info-for-tutorials/

Posted on

Getting Back to Work

Ok, so the web-site is up and running, now it’s time to get back to the fun stuff…er… work. Yeah, that’s right.. that’s what I meant. “Work”. 😉

While I was rewriting the descriptions for the tutorials so I could list them here, I realized that, for a lot of these designs, I hadn’t played around with them in a really long time. So I decided that I would start working from some of my own tutorials again and see what variations I can come up with. First up, my Odyssey – Woven Bezel for a Cabochon Tutorial. 


For this one I kept it pretty much true to the tutorial, except for one thing. I didn’t want the spiral that is at the bottom of the bail for the original design to cover up the detail on the face. Instead of making the spiral, I twisted both front wires together and pressed them against the bail, securing it in the back.

For this next one, I combined my Woven Bezel Tutorial with my Cobra Head Bail Pendant Tutorial

Because there are two sets of wires at the top of the pendant to work with, the basic woven bezel design lends itself very well to layered bails. For this one I decided to take advantage of that and not only layer it, but make a Cobra Head Bail as well. Instead of bringing the weave all the way to the front like in the Cobra Head Bail tutorial, I secured them to the woven bezel in a subtle wavy pattern, ending with asymmetrical swirls. I also changed up the weave a little bit so that it was a little less dense. This way you can see the green from the edge of the cabochon through the weave. It also helps to accentuate the mixed metals look I was going for, since you can see the gold colored frame wire behind the silver colored weaving wire.

This wasn’t the first time I’ve combined the two tutorials. I made the one below several years ago. I just forgot about it until after I made the new one.

For this one, I kept the denser weave. I felt it created a better frame for such a dark stone. I also kept the swirls on the sides symmetrical.

And now for the obligatory shameless self promotion stuff…yeah, you didn’t think you’d get away from it that easy did you?

If you’re here, I’m guessing you already know where to get the tutorials. Just click the links above each set of photos for the tutorials I talk about here. Or click on the “Shop” button above the blog post (in the black header bar) to see more tutorials.

Interested in the polymer clay cabochons I used for the first 2 pendants? I’m considering posting some of them for sale in the shop here on this web-site, but I haven’t decided yet. Until I do decide, you can find whatever I have available for now in one of my etsy shops, WireAndBeadSupplies

If you would like to purchase either of the first two necklaces shown here, you can find them at Shut Up And Cuff Me
You can find the Green, Silver and Gold Necklace here.
And you can find the Silver and Blue Face Necklace here.

Posted on

Up and Running Again!

Up and running again. And this time it only took a couple of days. Hmm… sometimes I even surprise myself. 😉

I do still have a few things to work on. The free tutorials aren’t up yet (but you can find the link to them on my other blog at the bottom of every page on this site). I hope to have all of those moved here within a couple of days. I’ll probably make a few minor design changes here and there too. But all of the tutorials for sale are up in the shop, and everything seems to be running smoothly. Now, here’s hoping I didn’t just jinx it by saying that. 🙂

Posted on

Making Changes!

I’m in the process of changing things up here a bit. I’ll have all the tutorials up here again soon. Until then, you can still purchase tutorials directly from my Gumroad profile, Craftsy or from my Etsy shops (links below). I plan to have everything up and running here again soon. Sorry for the inconvenience.

Wire Jewelry Tutorials on Gumroad
Wire Jewelry Tutorials on Craftsy
Wire Jewelry Tutorials on Etsy