Posted on

A Few More Video Tutorials

Things have been so crazy around here with the holidays coming up that I just can’t seem to get it all together sometimes. I did find time to do a few more videos, but being so scatterbrained lately, I completely forgot to update the blog to let you guys know about them.

Sooooo….

Hope you guys enjoy them. 🙂

Posted on

Fall Sale!

It’s that time of year again. Trees are starting to turn colors, leaves beginning to fall. The wind is picking up and I can already smell rain in the air. Soooooo….. I guess that means it’s time for the Fall Sale again.

This sale goes for all of my shops, both on and off of etsy. Prices are already reduced. See the links below for more details.

These are the sales for my newly refinished web-sites:

20% off at https://www.Gailavira.com
10% off at https://www.FairiesInTheForest.com
10% off at https://www.WireJewelryTutorials.com
10% off at https://www.WireAndBeadSupplies.com

And these are the sales for my etsy shops:

20% off at http://www.GailaviraJewelry.Etsy.com
10% off at http://WireAndBeadSupplies.Etsy.com
10% off at http://WireJewelryTutorials.Etsy.com
10% off at http://www.ShutUpAndCuffMe.etsy.com

I have lots more to list over the next few days too, so don’t forget to check back soon.

Posted on

Playing with my Woven Crystal Point Wrap Design

Normally, when I decide to teach a design, I do my best to strip it down to it’s easiest, most teachable, basic design, while still keeping it visually interesting. Once I have that part down and the tutorial is done, I have to see where else I can go with it. I like to push the limits on it and see how far I can take it. What will it look like on a different shape of focal? How many more curlicues can I add before it starts to look ridiculous? The design I teach in my Woven Crystal Point Wrap tutorial is no exception.

Woven Crystal Point Wrap Variation

This piece is made with a kite shaped polymer clay faux labradorite cabochon I made, then front drilled in order to add the wirework. I didn’t change the wirework too much from the tutorial, except to adjust it to the shape of the focal. I wanted to keep it simple so that it didn’t compete with the colors in the “stone”.

Woven Crystal Point Wrap Variation Woven Crystal Point Wrap Variation

For these two, I still kept it somewhat simple. I did add a little more detail to the design on the teardrop, but mostly it was just to take it farther down the stone. For the agate slice, I kept it neat and tidy near the top and added a few beads.


Woven Crystal Point Wrap Variation

This one is one of the earliest versions of this design. I made it back in 2011. I had this really thin agate point that I wanted to wrap but I wasn’t sure how to do it without making it too bulky looking. I kept the wirework close and tight and used an open style weave. To keep it from looking to plain I added beads tot he frame wire between the wraps for one section of it.

If you’d like to learn how to add beads onto the weave same way I did on this pendant, you can see my Seed Beaded Frame for a Focal Bead tutorial. It uses the same weave as this, with beads added.

Woven Crystal Point Wrap Variation Woven Crystal Point Wrap Variation

These are two of my favorites. In the right kind of light, these Opalite points seem to almost glow. I don’t like covering that up, so I prefer to keep the wrapping on them close to the top of the pendant. This doesn’t give a whole lot of room for variation, though. So to mix it up a bit on the one on the left, I used the Zig Zag Weave from my Advanced Weaving Techniques tutorial for part of the weaving. For the one on the right I made tiny double spirals and wrapped them onto the frame wires with the weaving wire to give it a filigree effect.


Woven Crystal Point Wrap Variation

At the time I made this one, I was playing around with different ways to incorporate stamped metal sheet into different designs. I attached it to the pendant by drilling holes into the sheet that line up with the hole in the stone. The wire is then inserted through both the stone and the 2 holes in the metal sheet, then worked as in the tutorial. I only did one woven wrap around the stone and finished both frame wires off in the back to keep the front simple.


Woven Crystal Point Wrap Variation

I made this one a little more complex. I added a skull bead to the top (both wires fit through the bead) and started the wrap above the skull instead of at the top of the crystal point.


Woven Crystal Point Wrap Variation

As with most things in life, as much as I say I love to keep things simple, I’m never really happy until I’ve mucked it up and made everything way too complicated. Do you really think jewelry design would be any different for me?

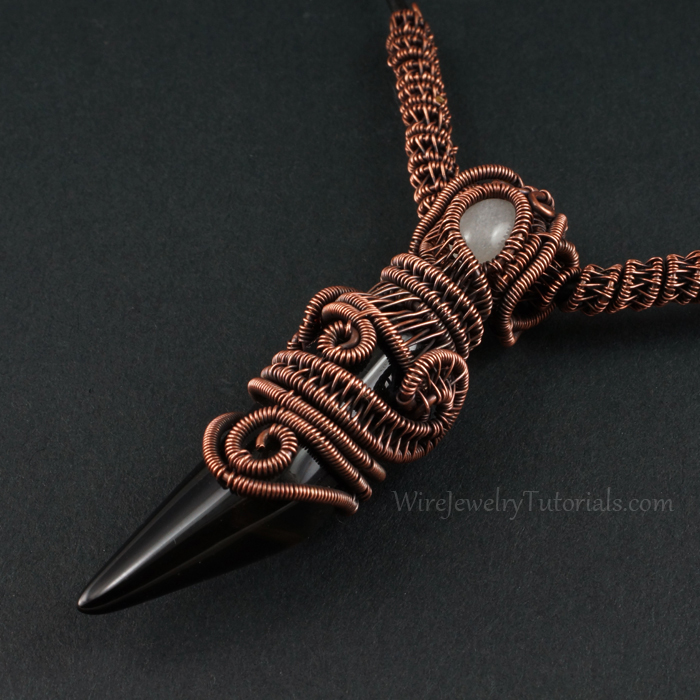
These agate claws have rather large holes in them, so it was easy to put extra wires through it. For this piece I took advantage of that and used the extra wires to make a much wider bail. This made it possible for me to trap a small quartz cabochon against the front of the bail with a woven bezel. The bezel I used is similar to the one I teach in my Odyssey tutorial, except that I used the weaving wire to attach it to the bail in several places as I went along. From there I continued to weave along the length of the stone as in the Woven Crystal Point Wrap tutorial. To make it more interesting, in a couple places I curled the frame wires back over themselves as I wove the wire over them to create curls and spirals.

If you are interested in purchasing faux labradorite polymer clay cabochons, I still have a few available in my supply shop on etsy, WireAndBeadSupplies.

If you would like more information about the first pendant shown above, you can find it at Fairies In The Forest.

Posted on

Grand Re-Opening Giveaway!

To celebrate the fact that I finally got around to redoing this web-site (which I’ve only been planning for almost a year now, lol) I decided to have a giveaway. So, here’s how it goes. Enter the giveaway using the rafflecopter widget below and whoever wins gets the FULL COLLECTION of tutorials from the web-site.

You can increase your odds of winning by doing each action on the widget. You can also come back every day to get another entry.

Giveaway ends on Tuesday, August 7th, 2018 at 11:59pm ET. The winner will be announced on Wednesday, August 8th, 2018.


a Rafflecopter giveaway

Still want to increase your odds of winning? I’m also holding a giveaway on Facebook. Check out the Gailavira Jewelry Fan Page to enter.

Terms and Conditions
Giveaway is open to anyone who lives on planet Earth.

All entries will be verified for validity before the final drawing. If the action corresponding to the entry was not committed, the entry will be deleted.

Although the winner will be given the tutorials for free, the copyright terms for premium (paid) tutorials still applies. Please see this page for more information:
https://www.wirejewelrytutorials.com/copyright-info-for-tutorials/

Posted on

Getting Back to Work

Ok, so the web-site is up and running, now it’s time to get back to the fun stuff…er… work. Yeah, that’s right.. that’s what I meant. “Work”. 😉

While I was rewriting the descriptions for the tutorials so I could list them here, I realized that, for a lot of these designs, I hadn’t played around with them in a really long time. So I decided that I would start working from some of my own tutorials again and see what variations I can come up with. First up, my Odyssey – Woven Bezel for a Cabochon Tutorial. 


For this one I kept it pretty much true to the tutorial, except for one thing. I didn’t want the spiral that is at the bottom of the bail for the original design to cover up the detail on the face. Instead of making the spiral, I twisted both front wires together and pressed them against the bail, securing it in the back.

For this next one, I combined my Woven Bezel Tutorial with my Cobra Head Bail Pendant Tutorial

Because there are two sets of wires at the top of the pendant to work with, the basic woven bezel design lends itself very well to layered bails. For this one I decided to take advantage of that and not only layer it, but make a Cobra Head Bail as well. Instead of bringing the weave all the way to the front like in the Cobra Head Bail tutorial, I secured them to the woven bezel in a subtle wavy pattern, ending with asymmetrical swirls. I also changed up the weave a little bit so that it was a little less dense. This way you can see the green from the edge of the cabochon through the weave. It also helps to accentuate the mixed metals look I was going for, since you can see the gold colored frame wire behind the silver colored weaving wire.

This wasn’t the first time I’ve combined the two tutorials. I made the one below several years ago. I just forgot about it until after I made the new one.

For this one, I kept the denser weave. I felt it created a better frame for such a dark stone. I also kept the swirls on the sides symmetrical.

And now for the obligatory shameless self promotion stuff…yeah, you didn’t think you’d get away from it that easy did you?

If you’re here, I’m guessing you already know where to get the tutorials. Just click the links above each set of photos for the tutorials I talk about here. Or click on the “Shop” button above the blog post (in the black header bar) to see more tutorials.

Interested in the polymer clay cabochons I used for the first 2 pendants? I’m considering posting some of them for sale in the shop here on this web-site, but I haven’t decided yet. Until I do decide, you can find whatever I have available for now in one of my etsy shops, WireAndBeadSupplies

If you would like to purchase either of the first two necklaces shown here, you can find them at Shut Up And Cuff Me
You can find the Green, Silver and Gold Necklace here.
And you can find the Silver and Blue Face Necklace here.